Quickstart
Cineware for Unreal enables seamless import of .c4d projects via Datasmith. It supports importing geometry as Static Meshes, materials, textures, cameras, and lights. Render visibility and PSR animations are imported as LevelSequences, while point-level and topology animations can be imported as Geometry Caches. However, Skeletal Meshes are not supported by Datasmith.
To use it, click the icon in the top bar, then choose Datasmith > File Import.
Cineware for Unreal – “Cineware by Maxon”
This Unreal Engine plugin allows you to import .c4d files through
Datasmith. The importer generates assets and actors directly from any Cinema
4D project, eliminating the need for Cineware caches. You can also expose
Cinema 4D attributes via the Take System and edit them directly in Unreal.
Please read this guide carefully. If you encounter errors, bugs, or any problems, contact our support at https://support.maxon.net.
Import Methods: Datasmith vs. Interchange
Cineware supports two workflows:
- Datasmith (UE 5.3+) – Supports legacy + Redshift cameras/lights/materials, Direct Link, and parameter editing via Takes. Does not support character animation.
- Interchange (UE 5.5+) – Redshift-focused with character animation support. No Direct Link or parameter editing. Limited support for legacy cameras/lights/materials.
| Capability | Datasmith (UE 5.3+) | Interchange (UE 5.5+) |
|---|---|---|
| Redshift cameras / lights / materials | Supported | Supported (RS-focused) |
| Legacy cameras / lights / materials | Supported | Limited / not focused |
| Direct Link | Supported | Not supported |
| Expose parameters via C4D Takes | Supported | Not supported |
| Character animation | Not supported | Supported |
| PSR animation | Supported | Supported |
| Geometry Caches | Supported | Supported |
| Drag & drop into Content Browser | Not supported | Supported |
Choose Datasmith for full Redshift + Takes workflows and Direct Link; choose Interchange for UE 5.5+ pipelines that needs drag & drop or character animation.
Installation
Installation
Prerequisites
- Supported on Windows and macOS.
- Unreal Engine: install via https://www.unrealengine.com/get-now.
- macOS: install the latest Xcode so Unreal can compile.
Download the Cineware installer here: Download Plugin for Unreal Engine
Version requirements
- Cinema 4D: 2025.x (installed in default path)
- Unreal Engine: 5.3 or newer (Interchange requires 5.5+)
Also available (older versions)
- Cineware 2025 installers for Unreal Engine 5.1–5.6 (Windows/macOS)
- Cineware 2024.5 installer for Unreal Engine 5.1
- Cineware 2023.2.2 (Windows)
- See the full list and download by UE version on the Cineware for Unreal download page.
Default Cinema 4D paths
- Windows:
C:\Program Files\Maxon Cinema 4D 2025 - macOS:
/Applications/Maxon Cinema 4D 2025
After downloading the correct installer, run it. The installer places the Cineware for Unreal plugin inside the Unreal Engine Plugins folder (Engine/Plugins/Marketplace) and optionally installs the Direct Link plugin inside the Cinema 4D plugins folder:
- Windows:
C:\Program Files\Maxon Cinema 4D 2025\plugins\Unreal Direct Link - macOS:
/Applications/Maxon Cinema 4D 2025/plugins/Unreal Direct Link
Installer destinations
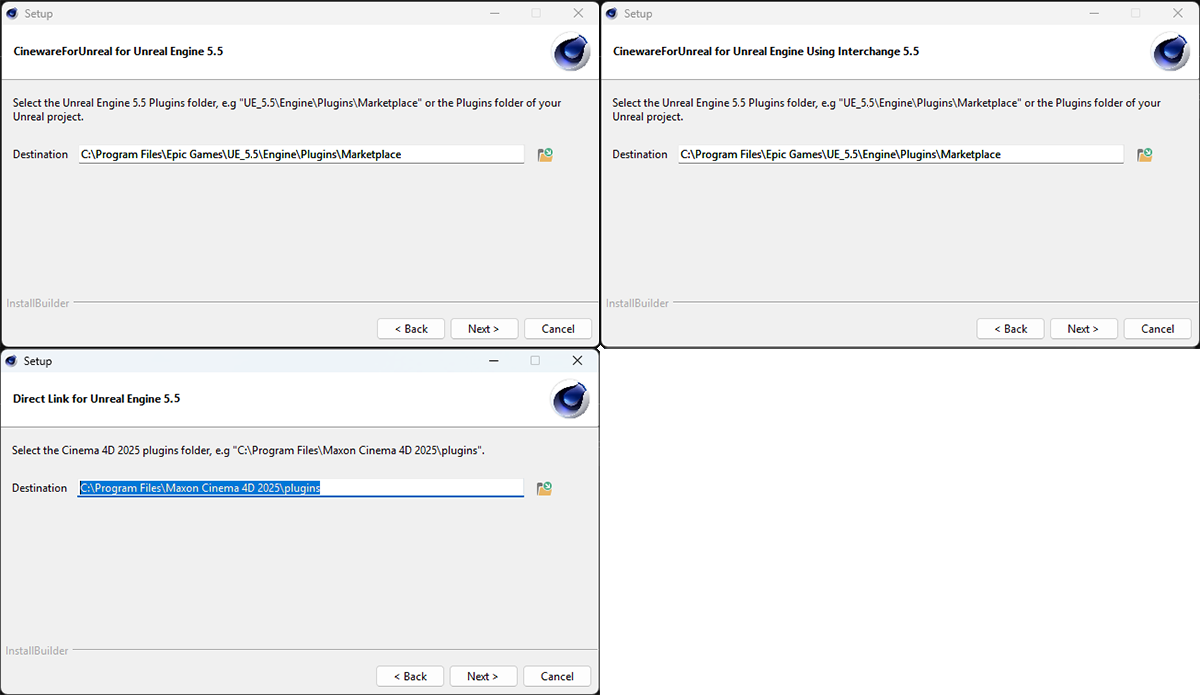
The installation paths for the Datasmith components of Cineware for Unreal, for the Interchange component, and the Direct Link plug-in for Cinema 4D must be specified separately.
This is certainly the preferred installation, but you can also decide to use the Cineware components only for a specific, already existing Unreal project. In this case, specify the Plugins folder in the corresponding Unreal project folder during the installation of the Datasmith and Interchange components.
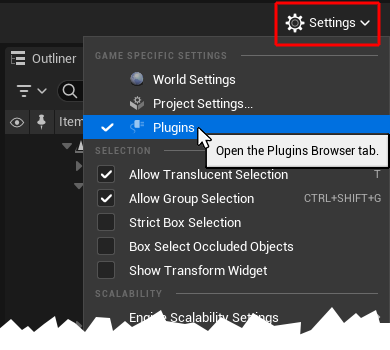
To check within the Unreal Editor whether all components required for full Cineware or Cinema 4D support have been installed and activated, open the Plugins Browser via the Settings menu in the Unreal Editor. If you have only installed the Cineware components for a specific project (in its Plugins folder), this project must first be opened.
Enable the plugin
Open your Unreal project and go to Edit > Plugins. Search for “Cineware” and ensure Cineware by Maxon is present and activated. If you can’t find it, confirm the plugin was installed correctly.
Possible Errors
The plugin is not listed — Make sure you installed the correct Cineware version for your Unreal Engine version (there is a matching plugin for each UE 5.x release). If you still have issues, please visit: https://support.maxon.net
Failed to import ‘file://… .c4d’ / Failed to load cineware — Ensure Cinema 4D 2025.x is installed in its default path.
Direct Link (C4D → Unreal)
Direct Link plugin – How to use it
This plugin works in one direction: from Cinema 4D to Unreal Engine.
- In Cinema 4D, create or open a scene and save the project (File > Save Project).
- Open Extensions > Unreal Direct Link > Direct Link Sync to send the scene to Unreal.
[SCREENSHOT: Direct Link Sync in C4D (leave for image)]
Click the cogwheel to configure Animation, Light Intensity Scale, and Camera ISO Scale to help match the look between Unreal and Cinema 4D.
[SCREENSHOT: Direct Link options dialog (leave for image)]
In Unreal, open the “Add” menu (cube with green plus) and choose Datasmith > Direct Link Import…, then select your Cinema 4D scene.
Currently Missing Features (Direct Link)
- Automatic re-syncing
- LODs
- Collision Geometry
- Metadata
- Geometry Cache animation over Direct Link (workaround: use Datasmith importer)
Known Issues
- On macOS, Unreal might not see Direct Link sources if there is an active VPN.
- Syncing Area Lights can cause issues (use at your own risk).
Datasmith Importer
Datasmith Importer – How to use it
In the Unreal Editor, click the icon in the top bar, then choose Datasmith > File Import. Select your Cinema 4D project and click Open.
Interchange Import (alternative)
You can also import via Interchange (UE 5.5+): drag a .c4d into the Content Browser or use File > Import Into Level and select a Cineware Pipeline Stack.
Selective Import
Import only selected elements (and their children) by enabling Selection Only in the Datasmith Import Options dialog.
[SCREENSHOT: Selection Only option (leave for image)]
Custom Frame Range
Import a subset of animation by enabling Custom Frame Range in the Datasmith Import Options dialog and specifying Start Frame and End Frame.
[SCREENSHOT: Custom Frame Range (leave for image)]
Geometry Caches
For any animation that isn’t just PSR keyframes (e.g., topology changes or animated Cloner counts), enable Import Geometry Caches in the Datasmith Import Options popup, then select which objects should be imported as Geometry Caches.
Alembic Caches
The plugin also imports animation/simulation cached in Cinema 4D to Alembic (e.g., rigid body simulation).
Configure caching options in the Attributes Manager > Cache tab (external cache recommended), then save and import via Datasmith.
Visibility Animation
Keys on Render Visibility are supported. Set them in the object’s Basic tab, or via the Object Manager stoplight dots (only the lower dot for render visibility is imported).
Redshift materials, lights, cameras
Redshift Materials
Redshift materials are supported. Switch the renderer to Redshift in Render Settings, then create/edit materials in the Node Graph and assign them to objects.
SSS-enabled Redshift materials (Subsurface Weight > 0) use a dedicated Unreal reference material with adjustable SSS parameters post-import.
Manage node-material texture resizing in Datasmith Import Options > Node Materials Textures.
Redshift Lights
Supported types: Point, Spot, Area, Infinite.
Unreal uses lumen/lux and behavior varies with cone angle/area, so Cineware applies the following conversions:
| Point Light | RS Units |
|---|---|
| Intensity (lm) = Intensity / π | Image |
| Intensity (lm) = Intensity | Luminous Power |
| Intensity (lm) = Intensity / (π × 1000) | Luminance |
| Intensity (lm) = Intensity × LuminousEfficacy | Radiant Power |
| Intensity (lm) = Intensity × LuminousEfficacy / (π × 1000) | Radiance |
Spot Light — Same as Point Light, then adjusted by cone angle: Intensity (lm) = Intensity × (1 − cos(ConeAngle) × 0.5)
| Area Light | RS Units |
|---|---|
| Intensity (lm) = Intensity × Area / (2π) | Image |
| Intensity (lm) = Intensity × Area | Luminous Power |
| Intensity (lm) = Intensity / (π × 1000) | Luminance |
| Intensity (lm) = Intensity × LuminousEfficacy × Area | Radiant Power |
| Intensity (lm) = Intensity × LuminousEfficacy / (π × 1000) | Radiance |
| Infinite Light | Units |
|---|---|
| Intensity (lux) = Intensity × 500 | Image |
| Intensity (lux) = Intensity × 200 | Luminous Power |
| Intensity (lux) = Intensity / 10 | Luminance |
| Intensity (lux) = Intensity × LuminousEfficacy / 17 | Radiant Power |
| Intensity (lux) = Intensity × LuminousEfficacy / 17 | Radiance |
Redshift Cameras
Supported properties:
- Focal Length
- Sensor Width (height from Render Settings’ Aspect Ratio)
- Focus Distance
- Shutter Speed
- ISO or Exposure (depending on camera mode)
- F-Stop
- Look-At Actor (if a Target is assigned)
Expose parameters via Cinema 4D Takes
Expose parameters via Cinema 4D Takes
Use Cinema 4D’s Take System to expose properties that become editable in Unreal’s CinewareAsset. Follow these steps:
- Open the Take workspace and click + Add New Take.
- Switch to the new Take. Scene properties are greyed out, indicating they can be overridden.
- Right‑click the property you want to expose and choose Override.
- Optional: expose an entire element (e.g., a Cloner) via Take Assignment > [Your Take].
- Save the
.c4dfile. Import or reimport via Datasmith. Unreal creates/updates a CinewareAsset next to the Datasmith asset holding the exposed properties.
Edit exposed parameters in Unreal
Double‑click the CinewareAsset to edit values. Press Reimport in the CinewareAsset editor to apply changes to the scene.
CinewareAsset
The initial import uses default values from Cinema 4D and creates a CinewareAsset next to the Datasmith asset containing the exposed properties.
Edit Values
Via UI
Double-click the CinewareAsset to edit properties. It’s linked to the Datasmith asset via file path (absolute/relative) so projects can be shared safely.
Via Editor Blueprints
Reference a CinewareAsset in Editor Utility Blueprints to set/read/browse values based on Editor events (runtime blueprints are not supported).
Setting properties by name
Use variables of type CinewareAsset and the provided Setter methods. Use the exact key name shown in the CinewareAsset panel (disable “Friendly Property Names” to see raw keys). Methods return true on success. Coordinate conversion nodes are provided (Unreal↔Cinema 4D).
Reading properties by name
Getter methods return a Boolean (success) and a type-specific data container (Key, Value, Type, position in C4D hierarchy).
Browsing for properties
Use Begin Iteration, then the appropriate “Get Next …” functions per type; check the Boolean return before accessing the container.
- The coordinate systems differ between Unreal and Cinema 4D—use the provided conversion nodes.
- Use raw (non-friendly) key names when setting by name.
- CinewareAsset Blueprint functions are available in Editor Blueprints only.
Reimport & Feedback
Reimport
- To apply CinewareAsset changes, press Reimport in the CinewareAsset Editor.
- To reimport the scene as saved in Cinema 4D, right-click the Datasmith asset and choose Reimport.
- Objects tagged with the annotation “exclude” are not imported.
Feedback
If you encounter issues, visit https://support.maxon.net to contact our support team.
Comments
0 comments
Article is closed for comments.